Introduction
Bathrooms are more than just functional spaces; they are sanctuaries where we start and end our days. A key element in bathroom design is the mirror, which not only serves a practical purpose but also acts as a focal point that can significantly enhance the room's aesthetic. Framed bathroom mirrors offer a blend of style and functionality, allowing homeowners to customize their bathrooms to reflect personal tastes and design preferences.
Creating a custom framed bathroom mirror through DIY projects can be both rewarding and cost-effective. It provides an opportunity to tailor the mirror to fit perfectly within your space, complement your existing decor, and add a unique touch that mass-produced mirrors often lack. This article delves into various DIY ideas for crafting personalized framed bathroom mirrors, offering step-by-step guidance and creative inspiration to help you transform your bathroom into a stylish retreat.

Why Choose DIY Custom Framed Bathroom Mirrors?
1. Cost-Effective
Purchasing pre-made framed mirrors can be expensive, especially when opting for high-quality materials or designer brands. By undertaking a DIY project, you can significantly reduce costs by selecting affordable materials and tools while still achieving a professional-looking result. This makes custom framed mirrors accessible to a wider range of budgets without compromising on style or quality. According to HomeAdvisor, DIY projects can save homeowners up to 50% on costs compared to professional installations.
2. Personalization
DIY allows you to design a mirror that perfectly matches your bathroom's aesthetic and your personal style. Whether you prefer a rustic wooden frame, a sleek modern design, or an ornate vintage look, the possibilities are endless. Customization ensures that your mirror complements other bathroom elements, creating a cohesive and harmonious space. Websites like Pinterest offer endless inspiration for unique framed mirror designs that cater to various tastes and styles.
3. Creative Expression
Engaging in a DIY project provides a creative outlet, allowing you to experiment with different materials, colors, and textures. It’s an opportunity to infuse your personality into your bathroom design, making it a true reflection of your tastes and preferences. Additionally, the satisfaction of creating something with your own hands adds a meaningful touch to your home decor.
4. Sustainability
Opting for DIY projects often means reusing or repurposing materials, which contributes to a more sustainable lifestyle. Using reclaimed wood, upcycled frames, or eco-friendly paints not only reduces waste but also adds character and history to your bathroom mirror. The Environmental Protection Agency (EPA) highlights the benefits of upcycling in reducing landfill waste and conserving resources.
DIY Ideas for Custom Framed Bathroom Mirrors
1. Rustic Wooden Frame

A rustic wooden frame can add warmth and a natural feel to your bathroom. This DIY project is perfect for those who love the charm of reclaimed wood or prefer a more earthy aesthetic.
Materials & Tools:
- Reclaimed wood planks or lumber
- Mirror (pre-cut to desired size)
- Wood glue
- Nails or screws
- Hammer or drill
- Sandpaper
- Wood stain or paint (optional)
- Paintbrushes or rags
Steps:
- Measure and Cut Wood: Measure the dimensions of your mirror and cut the wood planks to create a frame that fits snugly around the mirror.
- Assemble the Frame: Use wood glue and nails or screws to assemble the frame. Ensure all corners are secure and the frame sits flush against the mirror.
- Sand and Finish: Sand the frame to smooth out any rough edges. Apply wood stain or paint to match your bathroom decor, allowing it to dry completely.
- Attach the Mirror: Carefully place the mirror into the wooden frame and secure it with additional nails or clips if necessary.
- Mount the Mirror: Hang the framed mirror on the wall using appropriate mounting hardware, ensuring it is level and securely attached.
2. Metal Frame for a Modern Look

A metal frame can lend a sleek, contemporary vibe to your bathroom. This DIY project is ideal for those who prefer minimalist designs with clean lines.
Materials & Tools:
- Metal framing strips or ready-made metal frames
- Mirror (pre-cut to desired size)
- Metal screws or clips
- Screwdriver or drill
- Measuring tape
- Level
Steps:
- Select Metal Frame: Choose a metal frame that complements your bathroom’s color scheme and design style. Black, white, or metallic finishes are popular choices.
- Prepare the Frame: If using metal strips, measure and cut them to the appropriate lengths to form a frame around the mirror.
- Assemble the Frame: Attach the metal strips together using screws or clips, ensuring the frame is sturdy and correctly sized for the mirror.
- Mount the Mirror: Insert the mirror into the metal frame and secure it with additional screws or mounting hardware.
- Install on Wall: Use a level to ensure the mirror is straight before attaching it to the wall. Secure the mirror with screws or wall anchors as needed.
3. Ornate Vintage Frame

For a touch of elegance and nostalgia, an ornate vintage frame can transform a simple mirror into a statement piece.
Materials & Tools:
- Ornate vintage frame (can be found at thrift stores or antique shops)
- Mirror (pre-cut to match frame size)
- Mirror clips or adhesive
- Cleaning supplies
- Soft cloth
Steps:
- Find a Vintage Frame: Search for an ornate frame that matches the size of your mirror. Antique stores and online marketplaces are great places to find unique frames.
- Prepare the Frame: Clean the frame thoroughly to remove any dust or dirt. Check for any damages and make necessary repairs.
- Attach the Mirror: Place the mirror into the frame, using mirror clips or adhesive to secure it in place.
- Clean and Polish: Use a soft cloth to clean the mirror and frame, enhancing its vintage charm.
- Hang the Mirror: Install the mirror on the wall, ensuring it is level and securely mounted.
4. Floating Frame with Integrated Shelving

Adding shelves to your framed mirror can provide additional storage and display space, enhancing both functionality and style.
Materials & Tools:
- Floating shelf brackets
- Wood planks or floating shelf kit
- Mirror (pre-cut to desired size)
- Frame materials (wood, metal, etc.)
- Screws and mounting hardware
- Drill and screwdriver
- Measuring tape
- Level
Steps:
- Design the Frame and Shelves: Decide on the placement and number of shelves you want integrated into the mirror frame.
- Build the Frame: Construct the mirror frame using your chosen materials, ensuring there is space for the shelves.
- Install Shelves: Attach the floating shelf brackets to the frame and secure the wood planks or shelf kit in place.
- Attach the Mirror: Mount the mirror within the frame, ensuring it sits securely above or between the shelves.
- Mount to Wall: Hang the entire assembly on the wall, using a level to ensure it is straight and stable.
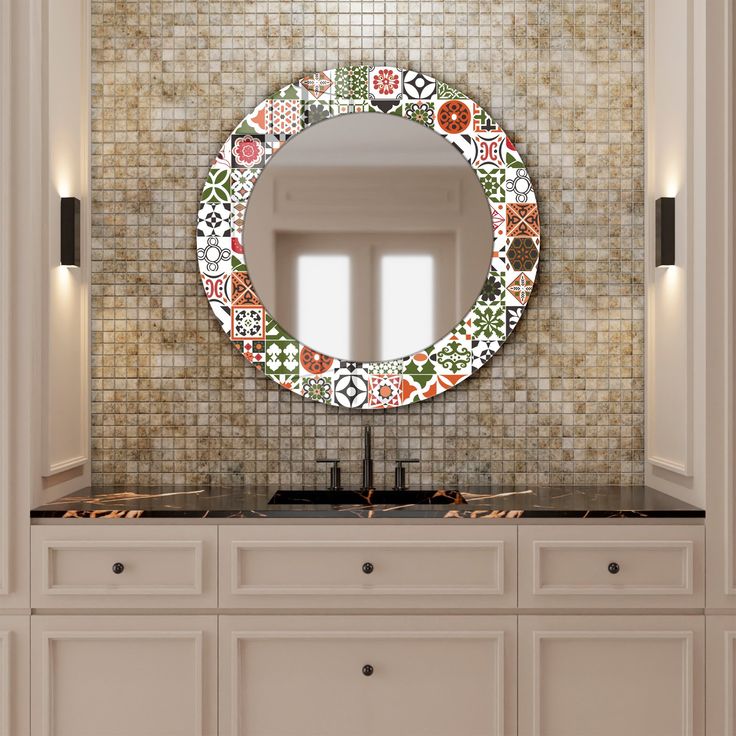
5. Glass Mosaic Frame

A glass mosaic frame adds a splash of color and artistic flair to your bathroom mirror, making it a true centerpiece.
Materials & Tools:
- Glass mosaic tiles
- Mirror (pre-cut to desired size)
- Tile adhesive
- Grout
- Tile spacers
- Tile cutter
- Grout float
- Sponge
- Safety gloves and goggles
Steps:
- Prepare the Frame: Clean the frame area around the mirror and ensure it is smooth and ready for tile application.
- Apply Tile Adhesive: Spread tile adhesive evenly on the frame area using a notched trowel.
- Place Mosaic Tiles: Press the glass mosaic tiles into the adhesive, using tile spacers to maintain even spacing.
- Let Adhesive Dry: Allow the adhesive to dry completely according to the manufacturer’s instructions.
- Apply Grout: Spread grout over the tiles, ensuring it fills the gaps between them. Remove excess grout with a sponge before it dries.
- Clean and Polish: Once the grout has set, clean the tiles and frame to reveal the vibrant mosaic pattern.
- Mount the Mirror: Attach the mosaic-framed mirror to the wall securely.
6. Upcycled Frame with Decorative Elements

Transforming an old or plain frame by adding decorative elements like beads, paint, or fabric can create a unique and personalized bathroom mirror.
Materials & Tools:
- Old or plain frame
- Decorative elements (beads, paint, fabric, etc.)
- Mirror (pre-cut to desired size)
- Glue gun and glue sticks
- Paintbrushes
- Scissors
- Decorative ribbons or lace (optional)
Steps:
- Choose a Frame: Select an old or plain frame that you want to transform. Ensure it is the right size for your mirror.
- Decorate the Frame: Use a glue gun to attach decorative elements such as beads, paint patterns, or fabric to the frame. Get creative with colors and textures to match your bathroom decor.
- Attach the Mirror: Place the mirror into the decorated frame, securing it with glue or clips.
- Add Finishing Touches: Incorporate additional decorative elements like ribbons or lace for added flair.
- Mount to Wall: Hang the customized mirror on the wall, ensuring it is level and secure.
How to Choose the Right DIY Framed Bathroom Mirror

1. Consider Your Bathroom’s Style
Before embarking on a DIY project, it’s crucial to consider the overall style of your bathroom. Whether your bathroom is modern, vintage, rustic, or eclectic, your framed mirror should complement the existing décor. For instance, a rustic wooden frame pairs well with natural materials like stone and wood accents, while a sleek metal frame enhances a contemporary or industrial bathroom design.
2. Select the Appropriate Materials
The choice of materials plays a significant role in the final appearance and durability of your framed mirror. Wood offers versatility and warmth, metal provides a modern edge, and stone adds a luxurious touch. Consider the bathroom's environment—materials should be moisture-resistant to withstand the humid conditions.
3. Determine the Size and Shape
The size and shape of the mirror should be proportionate to your bathroom space. In small bathrooms, a larger mirror can create an illusion of space, while in larger bathrooms, a smaller, decorative mirror can serve as a stylish accent. Common shapes include rectangular, oval, round, and square, each bringing a different aesthetic to the room.
4. Plan for Functionality
Beyond aesthetics, consider the mirror’s functionality. Do you need additional storage or lighting integrated into the frame? Would you benefit from built-in shelves or LED lighting? Planning for these functional aspects during the design phase can enhance the mirror’s practicality and usability.
5. Ensure Proper Mounting and Safety
Safety is paramount when installing a framed mirror. Ensure that the mounting hardware is appropriate for the mirror’s weight and size. Use wall anchors or studs to secure the mirror firmly to the wall, preventing accidents and ensuring longevity.
6. Think About Maintenance
Choose materials and finishes that are easy to clean and maintain. For example, wooden frames may require regular polishing, while metal frames might need occasional wiping to prevent tarnishing. Consider how much time and effort you’re willing to invest in maintaining the mirror.
Step-by-Step Guide to Creating a Custom Framed Bathroom Mirror
Step 1: Gather Your Materials and Tools
Before you begin, ensure you have all the necessary materials and tools. This typically includes:
- A pre-cut mirror
- Frame materials (wood, metal, etc.)
- Adhesives (wood glue, strong glue)
- Mounting hardware (screws, hooks, etc.)
- Decorative elements (tiles, beads, paint)
- Basic tools (hammer, drill, screwdriver, sandpaper)
Step 2: Design Your Frame
Sketch out your design on paper before starting. Decide on the frame’s size, shape, and style. Consider how it will fit within your bathroom’s layout and how it will complement other elements in the room.
Step 3: Prepare the Frame
Cut your frame materials to the required lengths and assemble them using adhesives and screws. Ensure all corners are square and the frame is sturdy enough to support the mirror.
Step 4: Add Decorative Elements
Customize your frame by adding decorative elements. This could involve painting the frame, adding mosaic tiles, attaching beads, or incorporating fabric. Let your creativity guide you to create a unique and personalized mirror.
Step 5: Attach the Mirror to the Frame
Secure the mirror within the frame using mirror clips or strong adhesive. Make sure the mirror is centered and firmly held in place to prevent any movement.
Step 6: Mount the Mirror on the Wall
Using a level, mark the desired position on the wall and install the appropriate mounting hardware. Carefully hang the mirror, ensuring it is straight and securely attached.
Step 7: Final Touches
Once the mirror is mounted, step back and assess its placement and appearance. Make any necessary adjustments to ensure it fits seamlessly into your bathroom’s design.
Creative Enhancements for Your DIY Framed Bathroom Mirror
1. Incorporate LED Lighting
Integrating LED strips into your frame can provide additional lighting, enhancing both the mirror’s functionality and the bathroom’s ambiance. LED lighting can be used to highlight the mirror, provide task lighting for grooming, or create a soft, ambient glow. LED Lighting Solutions offer a variety of options to customize your lighting needs.
2. Add Shelving or Hooks
For added functionality, incorporate small shelves or hooks into your frame design. This allows you to store small items like toiletries, brushes, or towels, keeping your bathroom organized and clutter-free.
3. Use Decorative Glass or Beads
Decorative glass pieces or beads can be embedded into the frame to add texture and visual interest. This technique works particularly well with wooden or metal frames, giving your mirror a unique and artistic touch.
4. Apply Stencils or Patterns
Using stencils, you can paint intricate patterns or designs onto the frame. This is a cost-effective way to add detail and personalize the mirror to match your bathroom’s theme.
5. Incorporate Natural Elements
Incorporating natural elements like seashells, stones, or dried flowers into your frame can bring a touch of nature into your bathroom, creating a serene and inviting atmosphere.
Maintenance Tips for Your Custom Framed Bathroom Mirror
1. Regular Cleaning
Keep your mirror clean by wiping it down regularly with a soft, lint-free cloth and a mild glass cleaner. Avoid using abrasive materials that can scratch the mirror or damage the frame.
2. Protect the Frame
Depending on the material used for your frame, you may need to apply protective finishes. For wood frames, regular polishing with a wood conditioner can maintain their appearance. Metal frames should be wiped down to prevent tarnishing and rust.
3. Check Mounting Hardware
Periodically inspect the mounting hardware to ensure the mirror remains securely attached to the wall. Tighten any loose screws and replace any worn or damaged hooks as needed.
4. Avoid Excessive Moisture
While bathrooms are naturally humid environments, try to minimize excessive moisture around the mirror. Use an exhaust fan or open a window during and after showers to reduce humidity and prevent damage to the frame materials.
5. Address Repairs Promptly
If you notice any cracks in the mirror or damage to the frame, address these issues promptly to prevent further deterioration. Replace cracked mirrors and repair or reinforce damaged frames to maintain the mirror’s integrity and safety.
Conclusion

Creating a custom framed bathroom mirror through DIY projects offers a unique way to personalize your bathroom, enhance its aesthetic appeal, and improve functionality. Whether you prefer the warmth of a wooden frame, the sleekness of metal, or the luxury of stone, DIY allows you to craft a mirror that perfectly fits your style and space.
By carefully selecting materials, following a structured approach, and incorporating creative enhancements, you can design a bathroom mirror that not only meets your practical needs but also serves as a stunning decorative element. Brands like ACE DECOR, along with other reputable names such as Kohler and West Elm, provide excellent resources and high-quality materials that can inspire and support your DIY endeavors.
Investing time and effort into a DIY framed bathroom mirror is a worthwhile endeavor that can transform your bathroom into a personalized haven. Embrace your creativity, experiment with different designs, and enjoy the satisfaction of creating a bespoke piece that truly reflects your taste and enhances your daily routines.
FAQ
1. How difficult is it to install a DIY framed bathroom mirror?
Installing a DIY framed bathroom mirror can range from moderately easy to challenging, depending on the complexity of the frame design and the installation method. Basic frames can be assembled with minimal tools, while more intricate designs may require additional skills and tools. If you're unsure, seeking help from a professional is recommended.
2. What materials are best for DIY framed bathroom mirrors?
Common materials for DIY framed mirrors include reclaimed wood, metal, and stone. Wood offers versatility and warmth, metal provides a modern edge, and stone adds a luxurious touch. Choose materials that complement your bathroom's style and are suitable for a humid environment.
3. Can I incorporate lighting into my DIY framed bathroom mirror?
Yes, integrating LED lighting into your framed mirror is a popular DIY enhancement. LED strips can be attached to the frame to provide additional illumination, improve visibility for grooming tasks, and create a pleasant ambiance in the bathroom.
4. How do I ensure my DIY mirror is securely mounted?
Ensure your mirror is securely mounted by using appropriate wall anchors and mounting hardware that can support the mirror’s weight. Always use a level to hang the mirror straight and double-check the stability before use. For heavier mirrors, consider using professional installation services.
5. Where can I find inspiration and materials for my DIY framed bathroom mirror?
Inspiration for DIY projects can be found on platforms like Pinterest, Instagram, and home décor websites. For materials, local hardware stores, online marketplaces, and specialty shops like ACE DECOR offer a wide range of frames, tiles, and decorative elements to help you create a personalized mirror.
