Table of Contents
- Do You Really Need a Backsplash Behind a Pedestal Sink?
- How High Should the Backsplash Be?
- Best Materials for a Pedestal Sink With Backsplash
- How to Install a Tile Backsplash Behind a Pedestal Sink (Simple, Doable Steps)
- Common Mistakes to Avoid
- FAQ
- Conclusion
- Related Articles
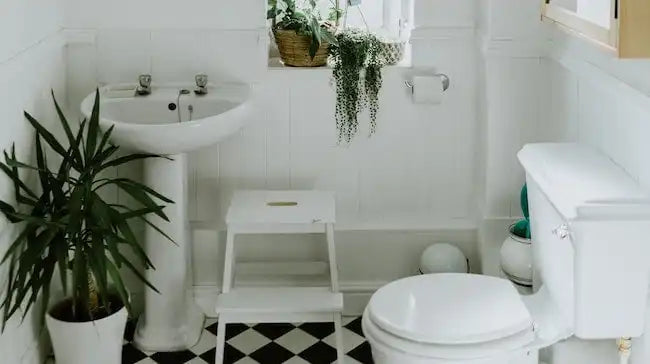
A pedestal sink with backsplash addresses two issues at once. For one, it's protecting your wall from the welter of daily splashed water and soap drips; streaks of toothpaste overspray that may stain paint and foster mildew. Second, it makes a visual "finish line" behind a skinny fixture so the sink area feels intentional and not like it's floating against a blank wall. Whether you are outfitting a powder room or updating a space-efficient bath where every inch counts, adding a backsplash to your pedestal sink is an easy project that rewards you with durability and the functionality of an extended vanity.
In addition to style and protection, a pedestal sink with backsplash helps keep the bathroom clean. Wipeable surfaces are also faster to clean than painted drywall; the smooth lines of tile, stone or waterproof panels make cleanup an easier chore. If you've ever spied water spots fanning out behind the faucet, you're already acquainted with the nuisance that this upgrade eradicates.
Do You Really Need a Backsplash Behind a Pedestal Sink?
Short answer: almost always yes. Unlike a vanity, though, with no rear deck on which to catch spray. That leaves an unobstructed path for any stray water right into your wall. And eventually, if they are subjected to enough wet-dry cycles, things like bubbling paint, spongy drywall, hairline cracks in plaster and musty seams. A nicely detailed pedestal sink with backsplash sheds water and makes cleaning chores easier.
When It's a Must-Have
- Kids' baths and family powder rooms: enthusiastic hand-washing = wide splash zone.
- High-arc/waterfall: the larger height causes a significant amount of rebound spray.
- Sinks with no aerator or shallow basin: the water crashes into the bowl and splashes back on itself.
- Rooms in busy homes or rental spaces: You'll want durability and the option to easily switch out decor items.
When It's a Nice-to-Have
- Low-use guest baths: low flow faucet + controlled use could keep walls dry.
- Highly scrubbable wall finishes: premium bathroom paint buys you time — but not forever.
- Ultra-minimal spaces: If you value the look of the barely there, you can minimize coverage (see tip below).
Style Bonus (You'll Notice Every Day)
A backsplash surrounds the mirror and sconces, so the sink pedestal does not look like a solo column. Repeating a material — subway tile, a thin cut of stone, or beadboard — brings texture and the feeling of craft into the mix. A pedestal sink with backsplash, that vertical sliver of material can be a discreet focal point without overwhelming a small room.
Match the outer edges of your backsplash to sink or mirror width. That alignment gives the entire composition an inlaid feel.
Quick "Splash Risk" Test
Not sure you need it? Do this 60-second check:
- Set the faucet to your usual pressure.
- Hold a piece of dry paper towel standing vertically on the wall behind the faucet for 10 seconds.
- If it "catches refuse" in the form of mist or droplets — or you notice beads forming on the paint next to the window after a shower — you're an excellent candidate for a pedestal sink with backsplash.
You don't have to go wall to all. A low-profile slab, or even single row or two rows of tile qualifies as a pedestal sink with backsplash, maintaining a more subdued look while guarding the wall. For an even more peaceful read, select a grout that matches the tile or slab.
How High Should the Backsplash Be?
It's all about achieving the right height, a feature that makes a pedestal sink with backsplash feel tailored and not just stuck on. As a general guide, allow for a band that is about 6-8 inches tall from the sink deck (approximately 15-20 cm). That's the sweet spot for catching regular splash without hogging the mirror. If the basin is shallow, the faucet with strong pressure or higher spout, push the top edge to 10–14 inch (25–36 cm). A good rule of thumb to keep it real: the back splash should end 2 inches above the faucet's aerator so that rebound spray doesn't skim the wall.
In small powder rooms, a taller panel can help the composition look more serene. Not only can a pedestal sink with backsplash be run under the mirror (or sconce line), it should if you desire that there be some "vertical field" to help visually anchor an otherwise slim footprint of a pedestal. Stashing the material just ½–1 inch below yields a more crisply shadowed line; continuing it behind the glass feels more built-in and is great when you're looking for your wall to feel truly seamless.
Width is just as important a consideration as height. But line the backsplash up with either your sink or mirror's width, so that all four edges stack really clean: It'll be just enough alignment to trick your (or anyone else's) eye into registering a custom job. If you are tight to a side wall, go with a short side return: 2 or 3 inches is all that's required to shield the corner from overspray. In an alcove, it often looks most pleasing to edge the pedestal sink with a backsplash all the way up to the room's inside corners so that the whole niche reads as a single architectural element.
Scale sizes can fueled your last size. Two courses of 3x6 subway tile plus a pencil liner land at around eight inches and feel classic; a low 4-inch slab upstand topped with one course of tile provides a stable, contemporary top edge; a mosaic band allows for half-inch adjustments to your finish-out, which helps you set the top edge right where you want it for clearing mirrors. Whatever option you prefer, make sure you finish the edges with bullnose or a slender metal trim (eased slab edge) and maintain a neat 100% silicone joint where the backsplash meets both sink and sidewalls so that entire assembly can move without cracking.
Mock it up before you commit. Tape a row of tiles (or a cardboard strip cut to size) to the wall, place mirror in position and step back — doorway distance away — checking sight lines at typical eye level. That 30-second drill is generally all the time you need to find an optimal height for your pedestal sink with backsplash.
Best Materials for a Pedestal Sink With Backsplash
Selecting materials for a pedestal sink with backsplash is more about balancing three things — water resistance, maintenance and scale. Since the surface area behind a pedestal is small, you can get away with "upgrading" the finish and not break the bank — think better tile or even a tiny stone slab. Seek out nonporous or well-sealed surfaces with a clean edge and a profile that matches the silhouette of the sink.

1. Ceramic & Porcelain Tile (the reliable classic)
If you're imagining an ageless tile on the wall behind your pedestal sink, it's likely to be ceramic or porcelain. They last, they're easy to clean and you'll find them in sizes that allow you to reach a very particular height. Classic 3×6 subway helps keep lines calm; elongated 2×8 or 3×12 makes a small wall seem taller. Keep those joints tight and make sure the grout either blends (quiet) or contrasts a bit (graphic). Use bullnose, pencil liner or thin metal trim to finish exposed edges for a clean edge.

2. Large-Format Porcelain & Slim Slabs (clean, minimal, few seams)
In the case of a modern pedestal sink with backsplash, a single porcelain panel or large-format tile translates to less grout and an even, clean read. It looks fantastic in small powder rooms, since multiple lines and breaks can feel cluttered. Templates are important here: measure around the faucet and any sconces before you take the plunge. The end result is an almost seamless plane that can be wiped clean in seconds.

3. Glass Tile (bright, reflective, space-stretching)
Glass reflects light, and magic needs all the help it can get in wee baths. Mosaics can be curved readily around fixtures; larger formats produce a pane-like sheen. Employ white thinset for true color, and prepare to wipe up water spots more frequently. Glare is muted by frosted or matte glass, while the sense of lightness persists.

4. Beadboard & Painted Wainscot (charm on a budget)
Moisture-resistant beadboard capped with a simple rail is just fine to be considered your pedestal sink with backsplash, in cottage or farmhouse rooms. Prime and topcoat with a wear-resistant enamel in semi-gloss or satin, and put down a clean bead of silicone where the sink meets the counter. Warm, cheap and has endless refresh potential with paint.

5. Natural Stone (marble, travertine, limestone—luxe with care)
Stone provides a custom luxury look, particularly as a small slab band that flows into the mirror. Opt for honed over polished finishes to hide etching and seal often. The soft veining of marble looks gorgeous matched to a vintage-style pedestal; straighter-grained stones complement contemporary forms. And keep it slightly unfussy with a simple edge — eased or pencil — so that the sink takes center stage.

6. Quartz & Solid-Surface (consistent, low-maintenance “slab look”)
If you adore the smooth feel of stone and need to avoid a lot of maintenance, quartz or solid-surface is absolutely one best backsplash for pedestal sink. The colours are spot on, edges neat and the smudges considerably less terrifying. It's also great for adding a small ledge for soap without the appearance of clutter.

7. Waterproof Wall Panels (PVC/FRP)
Panels are the fastest way to faux with a sturdy, little-jointed backdrop — useful for rentals or speedy flip outs. These days you've also got understated textures and tile-look patterns to choose from. Trim kits leave edges clean, and maintenance consists of little more than a wipe-down.

8. Peel-and-Stick (temporary, renter-friendly)
A stick-on backsplash for pedestal sink is an easy test drive, low commitment. Carefully prep the wall, press seams firmly and stay away from direct steam. It won't last as long as tile or slab, but it's an ideal material for styling a guest bath or staging a home.
How to Choose—By Priority
- Lowest maintenance: quartz/solid-surface, large-format porcelain.
- Affordable timeless look: Subway tile with matching grout, ceramic or porcelain.
- Statement, small space: honed marble or perhaps a porcelain slab in a soothing hue.
- Cozy/cottage: beadboard painted with enamel paint and a plain cap rail.
- Quick makeover: waterproof panels; peel-and-stick for a temporary refresh.
How to Install a Tile Backsplash Behind a Pedestal Sink (Simple, Doable Steps)
Replacing a pedestal sink with backsplash is a clean weekend project you can do that greatly improves your bathroom. The end result should be a straight, splash-proof strip of tile that aligns with your mirror and looks like it belongs there.
What you'll need
| Tool / Material | What it’s for | Specs / Notes | Alternatives / Tips | Typical Qty* |
|---|---|---|---|---|
| Tile | The visible backsplash surface | Classic 3×6 ceramic/porcelain works well; elongated 2×8 or 3×12 feels taller | Mosaics add flexibility for height; honed stone = softer look | Area to cover + ~10% waste |
| Tile spacers | Keep grout joints even | 1/16–1/8 in joints (tight = cleaner look) | Wedges help on wavy walls | 1 bag |
| Edge trim | Finish exposed edges cleanly | Bullnose tile, pencil liner, or slim metal profile | Match metal to faucet/sconces | Length = exposed edges |
| Painter’s tape | Protect sink/walls; mark guides | Low-tack; clean release | Also tape a drop cloth over the pedestal | 1 roll |
| Level | Keep rows straight | 24–48 in spirit level or a laser line | Check both horizontal and vertical | 1 |
| Pencil | Layout lines and marks | Soft lead is easier to erase | Fine-tip marker for trim cuts | 1 |
| Ledger board | Temporary support for first row | Straight 1×2, perfectly level | Remove after set; leave 2–3 mm gap above sink | 1 piece cut to width |
| Notched trowel | Proper adhesive coverage | ¼×³⁄₁₆ in V-notch (small tile); ¼×¼ in square-notch (larger/stone) | Back-butter tiles if wall is uneven | 1 |
| Adhesive | Bond tile to wall | Ready-mix mastic for ceramic/porcelain; thinset for stone/glass | White thinset under glass to keep color true | ~1–2 qt for small band |
| Tile cutter / wet saw | Clean, accurate cuts | Score-and-snap for ceramic; wet saw for glass/stone & precise corners | Rent a saw for a day if needed | 1 |
| Grout | Fill joints | Sanded for ≥1/8 in; unsanded for ≤1/8 in; epoxy = ultra low-maintenance | Color close to tile = calm; contrast = graphic | 1 small bag / 1 qt |
| Grout float | Press grout into joints | Rubber float; work diagonally | Keep a margin float for tight spots | 1 |
| Sponge + bucket | Wipe and detail | Clean water; light passes to avoid washing out grout | Microfiber for final haze buff | 1 each |
| 100% silicone caulk | Seal at sink, corners, edges (movement joints) | Bathroom-rated; smooth bead with water/soap | Color-matched silicone looks seamless | 1 tube |
| Matching color caulk | Visual blend at inside corners | Use silicone in wet zones; match grout color | Keep a spare for future touch-ups | 1 small tube |
*Typical quantities assume a compact pedestal sink with backsplash — e.g., ~24 in wide × 8–12 in high. Increase amounts if you’re running the field up to the mirror or sconce line.
Before you begin: remove any mirror, along with any switch/outlet plates; turn off power if you'll be tiling around an outlet; clean the wall and slightly rough up shiny paint; make a centerline on the wall and the height where you plan to tile.
Step-by-step (keep it simple)
- Plan & measure. Mark your desired height and centerline. Dry-fit a row to confirm cuts around the faucet and supply lines.
- Protect & level. Tape off the sink and set a temporary ledger board (perfectly level) at the first tile course.
- Adhesive. Use tile mastic for small ceramics or thinset for stone/glass. Comb evenly.
- Set tiles. Start at the centerline and work outwards with spacers. Keep lippage minimal—your mirror will highlight unevenness.
- Edge finish. Use bullnose, a pencil liner, or metal trim for clean borders.
- Grout. After adhesive cures, grout and wipe. Seal grout (and stone) per product directions.
- Seal joints. Use 100% silicone at the sink-to-tile change of plane to prevent water intrusion.
- Re-mount mirror/sconces. If you ran tile behind them, pre-drill through grout lines when possible.
moderate. A small pedestal sink with backsplash is a weekend project with careful layout.
Common Mistakes to Avoid
- Stopping too low. If the faucet's splash zone sits above your tile, you've missed the point.
- No movement joint. Always caulk (don't grout) where tile meets the sink or sidewalls.
- Busy + small scale. In tiny rooms, choose one statement: bold color or intricate pattern, not both.
- Forgetting storage. Add a small shelf, ledge, or towel ring so the pedestal doesn't feel sparse.
FAQ
1. Is a pedestal sink with backsplash a good value versus replacing the whole vanity?
Yes—especially for partial remodels. A pedestal sink with backsplash protects the wall, modernizes the focal area, and avoids big plumbing or flooring changes. You keep the airy, minimalist look many West Coast homes favor, and you control spend by upgrading just the materials behind the sink. Typical budgets: a compact tile band can be very affordable, while a quartz or porcelain slab gives a seamless, contemporary finish without the cost of a full vanity swap.
2. Can I DIY this, or should I hire a pro?
Most homeowners can install a pedestal sink with backsplash over a weekend if the wall is flat and the layout is simple. The keys are a level ledger board, consistent grout joints, and 100% silicone where the tile meets the sink and corners. Consider a pro if your wall is out of plumb, you're cutting around outlets/sconces in tight spots, or you're using glass/stone that needs a wet saw. Pro help also makes sense if you want the backsplash to run behind a heavy mirror or you're coordinating with new lighting.
3. What materials hold up best in hard-water, busy households?
For durability with low upkeep, porcelain or ceramic tile and quartz or large-format porcelain slabs are standouts. They shrug off daily splashes and clean quickly—a big plus in high-traffic powder rooms. Pair them with epoxy or high-performance grout to resist staining, and finish with mildew-resistant silicone. If you prefer natural stone, choose honed finishes and keep up with sealing. For cleaning in hard-water areas, use pH-neutral cleaners and a quick towel wipe after use to prevent spots; avoid vinegar or acidic products on stone.
4. What height and width look best with a modern, minimalist style?
Aim for a backsplash that rises 6–8 inches above the sink deck for everyday protection; go 10–14 inches if your faucet sits high or splashes more. Align the backsplash width with the sink or mirror so edges stack neatly—this makes the composition feel built-in and calm. In small rooms, running the pedestal sink with backsplash up to the underside of the mirror (or sconce line) creates a clean vertical field that reads intentional without visual clutter.
Conclusion
A pedestal sink with backsplash is one of those small upgrades that pays off every day. It protects your walls from moisture, frames your sink and mirror as a unified focal point, and brings a clean, modern finish to spaces where every inch counts. Whether you opt for classic ceramic tile, a sleek porcelain slab, or a low-profile beadboard panel, the right backsplash choice balances durability with style and makes daily upkeep far easier.
For homeowners planning a partial bath refresh—especially in high-traffic powder rooms or compact guest baths—a pedestal sink with backsplash strikes the sweet spot between value, practicality, and design impact. It's a project that can often be tackled in a weekend yet leaves a lasting impression, blending the confidence of durability with the simplicity of modern design.
If you're ready to upgrade, take time to choose materials that fit your lifestyle, mock up the height and width before you commit, and invest in quality finishes like grout sealant and silicone for long-term peace of mind. The result will be a bathroom detail that feels polished, stands up to daily life, and makes your home that much more enjoyable.
Related Articles
Looking for more inspiration and practical tips? Explore these related articles to help you plan and style your bathroom with confidence.
- "Types of Medicine Cabinets: How to Choose the Right Storage for Your Bathroom"
- "10 Unique Bathtubs That Transform Your Bathroom into a Personal Oasis"
- "The Complete Guide to Choosing the Best 2 Person Jacuzzi Bathtub for Your Home"
- "How to Customize Mirrors: A Complete Guide to Creating Personalized Designs for Your Home"
- "L-shaped Bathroom Vanities: Top Tips to Avoid Design Errors and Save Space"
- "How to Clean a Dirty Bathtub Without Scrubbing in 15 Minutes"
